As a Toyota forklift operator or mechanic, you know that occasional errors are a natural part of the job. It’s worth noting that E01-1, E01-2, E01-3, and E01-4 are common errors that you might encounter, but they’re not insurmountable challenges. These Toyota forklift error codes can be a headache, but fortunately, with a little troubleshooting, you can have your Toyota forklift up and running in no time.
Fortunately, in this guide, we’ll examine these errors in detail, clarify their meanings, and provide guidance on how to reset them.
So, whether you’re a forklift operator or a mechanic who’s eager to master the troubleshooting process of E01-1, E01-2, E01-3, and E01-4 errors on Toyota forklifts, keep reading!
Errors E01-1, E01-2, E01-3, E01-4 on Toyota Forklift
The Toyota forklift’s E01-1, E01-2, E01-3, and E01-4 codes suggest issues with the fuel delivery system or Fuel Feedback Control Abnormalities, but they’re not problems without solutions. If the forklift is consuming rich gasoline, it could trigger E01-1, whereas using lean gasoline could result in E01-2. On the other hand, Toyota forklifts running on rich or lean LPG can experience E01-3 and E01-4, respectively.
When the fuel feedback control system malfunctions, the engine may receive inaccurate information about the amount of fuel necessary to maintain a steady speed, leading to errors. This causes the Toyota forklift’s engine to stall or run erratically.
If you encounter these E01-1 to E01-4 error codes, it’s important to take action quickly to prevent further damage to your forklift and ensure that it’s safe to operate.
Probable Causes
Toyota forklift error codes E01-1, 01-2, 01-3, and E01-4 indicate one or more of the following different malfunctions.
- Intake System Defect
- Exhaust System Defect
- Sensor Defect
- Ignition Defect
- Fuel System Defect
- Harness Defect
- Engine Controller Defect
Resetting Guide
Fortunately, resetting these codes can solve the issue. However, if the problem persists, it might indicate a faulty part or sensor that requires replacement. Here are the simple steps to reset error codes E01-1, E01-2, E01-3, or E01-4 on a Toyota Forklift:
- Disconnect the negative terminal of the battery for more than 10 seconds.
- Check the connection status of the C1 connector.
- Disconnect C1 and perform a visual and contact pressure inspection of the connector.
- Short circuit the service connector TC terminal with the E1 terminal.
- Connect C1 and the battery negative terminal. Note: For combination vehicles, switch the fuel changeover switch to gasoline.
- Turn the ignition key switch ON (engine stopped).
- Depress the accelerator pedal 5 times fully (from fully open to fully closed) within 30 seconds.
- Start the engine and check that the error has been cleared.
- Disconnect the battery negative terminal again.
- Disconnect the TC and E1 terminals.
- Reconnect the battery negative terminal.
- Start the engine and let it idle for a few minutes.
- Fully depress the accelerator pedal for 3 minutes with the direction neutral. Then release and leave the accelerator pedal.
- Run the engine at idle for 2 minutes.
- Repeat steps (13) and (14) for 3 times.
- Turn the ignition key switch OFF and leave it off for one minute.
- Repeat steps (12 to 16) for 3 times.
- This will reset the E01-1 or E01-2 on the Toyota Forklift.
Troubleshooting Guide
If for some reason the error code does not resolve by resetting it, don’t worry. You can move on to a more detailed troubleshooting process. This process involves inspecting different sensors and parts of the forklift to identify the root cause of the issue.
It is important to note that the inspection steps need to be followed in an accurate sequence to ensure that you do not miss any potential issues. Therefore, it is recommended that you start inspecting your Toyota forklift in the following sequence:
1). Air Intake Inspection
The method of troubleshooting starts with an air intake inspection. Simply start the forklift’s engine and check if there’s a presence of air being sucked in from the engine oil level gauge, oil filler cap, or PCV hose. As well as the connections between the air cleaner and the cylinder head.
Remember, there must be no air being sucked in as this can cause an imbalance in the air-fuel ratio, leading to an incorrect fuel feedback control. This can cause your Toyota forklift’s engine to misfire and result in the e01 error codes being triggered.
If air is being sucked into the system, the next step is to identify the source of the problem and make the necessary repairs. This may involve replacing damaged or worn components, such as hoses, seals, or gaskets, or cleaning or replacing the air filter.
👉 If the error code is resolved, good.
Otherwise, proceed to the next inspection step below.
⬇️⬇️⬇️
2). Exhaust Gas Leakage Inspection
The Exhaust Gas Leakage Inspection is a diagnostic process that involves starting the engine and checking if there is any exhaust gas leakage from the exhaust system parts and connections between the cylinder head and the catalytic muffler.
Exhaust gas leaks can be prevented with proper maintenance and can help ensure optimal engine performance, improved fuel efficiency, and reduced emissions. In addition, taking steps to prevent exhaust leaks can also help protect the health and safety of operators and other personnel who may be exposed to toxic fumes.
👉 If the error code is resolved, good.
Otherwise, proceed to the next inspection step below.
⬇️⬇️⬇️
3). Fuel Leakage Inspection
Regular maintenance can help prevent fuel leakage in forklifts and promote increased fuel efficiency, reliable engine performance, and decreased environmental pollution. Moreover, ensuring proper fuel system maintenance can help prevent workplace accidents and minimize the risk of fire hazards.
To troubleshoot Toyota Forklift errors between E01-1 and E01-4, the first step is to start the engine and visually inspect the fuel system parts and connections between the fuel pump and injectors for any signs of fuel leakage. If fuel is detected, it’s important to identify the source of the problem and fix it immediately to prevent further damage or safety risks.
👉 If the error code is resolved, good.
Otherwise, proceed to the next inspection step below.
⬇️⬇️⬇️
4). Fuel Pressure Inspection (for Gasoline) / Regulator Primary Pressure Inspection (for LPG)
Toyota Forklift error codes E01-1 and E01-2 can be useful indicators of potential fuel system issues. By identifying and addressing problems with components such as the pressure regulator, fuel filter, or fuel pump, forklift operators can help ensure optimal performance and efficiency.
Fixing pressure regulator defects can help promote proper fuel pressure and prevent performance issues while resolving fuel filter defects can help prevent blockages and maintain the fuel flow. Similarly, addressing fuel pump defects can help ensure proper fuel pressure, improve efficiency, and prevent other performance problems in forklifts.
To perform a fuel pressure inspection, you’ll need a fuel pressure gauge. First, locate the fuel pump and remove the fuel pressure regulator cap. Attach the fuel pressure gauge to the regulator cap, and then start the forklift to measure the pressure in the fuel system. You can then compare this reading to the manufacturer’s specifications to determine if the pressure is within the proper range.
If fuel pressure is too high, it can cause excessive fuel consumption, engine damage, and even fires. On the other hand, if fuel pressure is too low, it can cause poor engine performance, decreased fuel efficiency, and stalling.
👉 If the error code is resolved, good.
Otherwise, proceed to the next inspection step below.
⬇️⬇️⬇️
OR
If the Toyota Forklift is running on LPG/CNG and is displaying error codes E01-3 or E01-4, it could indicate a regulator defect. In this case, the following steps can be taken to perform a regulator primary pressure inspection:
- Allow the forklift to cool down by turning it off before starting the inspection.
- Locate the pressure regulator on the fuel system.
- Disconnect the fuel supply hose from the regulator inlet.
- Attach a pressure gauge to the regulator inlet.
- Turn on the forklift and let it idle.
- Observe the pressure gauge reading and compare it to the manufacturer’s specifications.
- If the pressure reading is within the acceptable range, the regulator’s primary pressure is functioning correctly. If not, the regulator may need to be replaced.
- Reconnect the fuel supply hose to the regulator inlet and turn off the forklift.
👉 If the error code is resolved, good.
Otherwise, proceed to the next inspection step below.
⬇️⬇️⬇️
5). Spark Plug Individual Inspection
The Toyota forklift’s spark plugs are responsible for igniting the fuel-air mixture in its combustion chamber. A well-maintained spark plug with sufficient gap enhances engine performance, preventing misfires.
To ensure the spark plugs are functioning properly, it is important to carry out a spark plug individual inspection. This involves inspecting the spark plug for any signs of wear or damage, such as cracks, carbon deposits, or corrosion. To ensure good engine performance, replace the spark plug if any warning signs appear.
To inspect the spark plugs of a Toyota forklift, follow these steps:
- Turn off the engine and let it cool down.
- Locate the spark plugs on the engine. The number of spark plugs will depend on the type of engine installed in the forklift.
- Remove the spark plug wires or ignition coils to access the spark plugs.
- Check the condition of the spark plugs for any signs of wear, damage, or fouling.
- If the spark plugs are dirty, clean them with a wire brush or replace them if necessary.
- Reconnect the spark plug wires or ignition coils.
- Start the engine and ensure that it’s running smoothly without error codes.
👉 If the error code is resolved, good.
Otherwise, proceed to the next inspection step below.
⬇️⬇️⬇️
6). Injector Individual Inspection
Injectors are critical components of the engine in a forklift and are responsible for delivering the precise amount of fuel to the engine cylinders.
When a Toyota forklift experiences an error code ranging from E01-1 to E01-4, it could mean that there is a problem with one or more of the injectors.
Inspecting the injectors individually involves removing each injector and checking its condition. Look for signs of wear and tear, damage, or clogging in the nozzle or spray tip. Also, inspect the fuel inlet and outlet ports for any obstructions or blockages. Ensure that the injectors are clean and that the spray pattern is uniform.
👉 If the error code is resolved, good.
Otherwise, proceed to the next inspection step below.
⬇️⬇️⬇️
7). Intake Pipe Pressure Sensor Voltage Inspection
The intake pipe pressure sensor is an important component of the engine control system that measures the air pressure in the intake manifold. It provides feedback to the engine control unit (ECU) to adjust the air-fuel mixture and ensure optimal performance. The intake pipe pressure sensor can fail due to various reasons such as wear and tear, damage, or wiring issues. When the sensor fails, it can cause the ECU to receive incorrect data, resulting in the engine running rough and leading to the E01-2 or E01-3 error code.
To diagnose this issue, it is important to inspect the intake pipe pressure sensor voltage. The standard pressure for the intake manifold should be 3.6 ± 0.3 V (100 ± 10 kPa (1 ± 0.1 kgf/cm2) [14 ± 1.4 psi]). If the voltage reading is outside of this range, it indicates a problem with the sensor.
👉 If the error code is resolved, good.
Otherwise, proceed to the next inspection step below.
⬇️⬇️⬇️
8). Intake Temperature Sensor Inspection
The Intake Temperature Sensor plays a crucial role in providing the engine control module (ECM) with real-time information about the temperature of the air entering the engine. Based on this information, the ECM can adjust the air-fuel mixture to ensure efficient combustion, which in turn reduces emissions and improves fuel economy.
If the Intake Temperature Sensor is defective or fails, the ECM may not receive accurate information about the temperature of the intake air, which can lead to poor engine performance, increased emissions, and reduced fuel efficiency. As a result, it is important to identify and resolve any issues with the sensor promptly.
An error code is triggered when the ECM detects a voltage signal outside of the expected range from the Intake Temperature Sensor.
To diagnose the issue, the Intake Temperature Sensor voltage should be inspected using a voltmeter. The standard readings for the THA (Intake Air Temperature Sensor) voltage are:
| THA | 2.4 ± 0.6 V (20 ± 10°C) |
| 0.55 ± 0.15 V (80 ± 10°C) (reference value) |
If the voltage readings are outside of the expected range, it may indicate a problem with the Intake Temperature Sensor or the wiring connected to it. It is recommended to consult with a qualified technician to diagnose and repair the issue.
👉 If the error code is resolved, good.
Otherwise, proceed to the next inspection step below.
⬇️⬇️⬇️
9). Coolant Temperature Sensor Inspection
The Coolant Temperature Sensor is responsible for monitoring the temperature of the coolant in the engine. And sends this information to the engine control module (ECM), which uses it to adjust the air/fuel ratio and other engine parameters. The error code will be triggered if the coolant temperature sensor is malfunctioning or sending inaccurate signals.
To diagnose the problem, a technician can perform a voltage inspection of the coolant temperature sensor. This involves starting the engine and allowing it to warm up completely, then measuring the voltage output of the sensor using an I/O monitor. The standard readings for the sensor should be:
| THW | 0.55 ± 0.15 V (80 ± 10°C) |
| 2.4 ± 0.6 V (20 ± 10°C) (reference value) |
👉 If the error code is resolved, good.
Otherwise, proceed to the next inspection step below.
⬇️⬇️⬇️
10). Harness Continuity and Short Circuit Inspection
The harness plays an important role in the operation of the forklift, as it connects the electrical components of the vehicle. If the harness is damaged or has a short circuit, it can cause the forklift to malfunction or display an error code.
To diagnose a harness defect, the harness continuity and short circuit inspection procedure may be followed. This involves checking the wiring for any breaks, damage, or other issues that could interrupt the flow of electrical current. If any problems are found, the wiring may need to be repaired or replaced to resolve the issue.
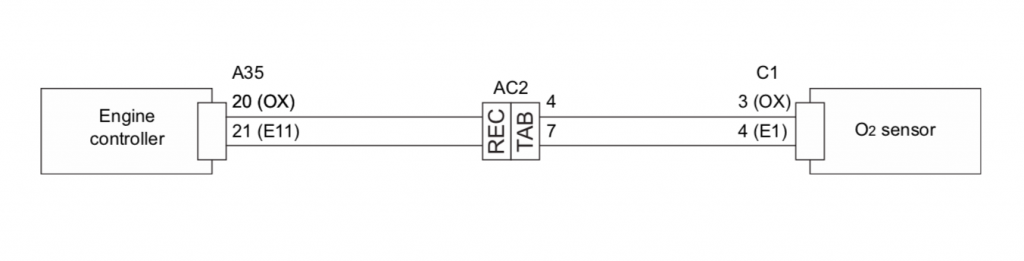
The standard readings for different connectors should be:
| A35-20 ~ C1-3 | Continuity |
| A35-21 ~ C1-4 | Continuity |
| A35-20 ~ Frame | No Continuity |
👉 If the error code is resolved, good.
Otherwise, proceed to the next inspection step below.
⬇️⬇️⬇️
11). O2 Sensor Inspection for Connector Contact Defect
The O2 sensor voltage inspection is a diagnostic procedure used to determine if the oxygen (O2) sensor in a Toyota forklift is functioning correctly. The O2 sensor measures the amount of oxygen in the exhaust gas to help the engine control system adjust the air/fuel mixture for optimal combustion.
The connector connection plays a crucial role in transmitting the voltage signal from the O2 sensor to the engine control module. If the connector is faulty, it can interfere with the voltage signal and cause the engine control system to receive incorrect readings.
- To inspect the O2 sensor voltage output, start by connecting A35 and C1.
- Then, start the engine and let it warm up completely.
- Set the direction to neutral and fully press the accelerator pedal.
- Measure the O2 sensor voltage using the I/O monitor: OX.
- The Standard Voltage Readings should be: OX 0.4 V or less and 0.5 V or more alternately output.
- If the readings are outside of this range, then there may be a problem with the connectors that connect the O2 sensor to the ECM.
👉 If the error code is resolved, good.
Otherwise, proceed to the next inspection step below.
⬇️⬇️⬇️
12). O2 Sensor Voltage Inspection for Engine Controller Defect
If the connector contact is functioning properly, you can assess any defects in the engine controller by taking O2 sensor voltage readings. In the case of a Toyota forklift, an engine controller defect may trigger an error code, as it regulates the air-fuel mixture and monitors the O2 sensor’s output.
An engine controller defect can result in the O2 sensor reading incorrect voltage levels, causing the check engine light to appear, and E01-1, E01-2, E01-3, or E01-4 codes to be generated.
To inspect the output of an O2 sensor in a Toyota forklift for checking engine controller defect, you can follow these steps:
- Disconnect the C1 connector.
- Connect a voltmeter or an oscilloscope probe to pin A35 of the connector.
- Start the engine and let it warm up completely.
- Set the direction of the forklift in neutral.
- Fully open the accelerator pedal.
- Read the O2 sensor voltage on the voltmeter or oscilloscope.
- The standard voltage readings should be OX 0.2 V or less (I/O monitor: OX).
Summary
In conclusion, troubleshooting error codes E01-1, E01-2, E01-3, and E01-4 on a Toyota forklift can be challenging, but it is a manageable task. It can be done efficiently with a systematic approach.
These error codes indicate a Fuel Feedback Control Abnormality, which can be easily resolved by identifying and fixing issues with the fuel delivery system.
By following the steps outlined in this guide, you can identify and resolve a range of issues that could be causing these errors, including intake system defects, exhaust system defects, sensor defects, ignition defects, fuel system defects, harness defects, engine controller defects, and more.
Remember to always prioritize safety and seek the help of a qualified technician if necessary.